Posts

Showing posts with the label Natural Hair Pictorials

How to Saran Wrap Roller Set to Straighten Natural Hair

Image
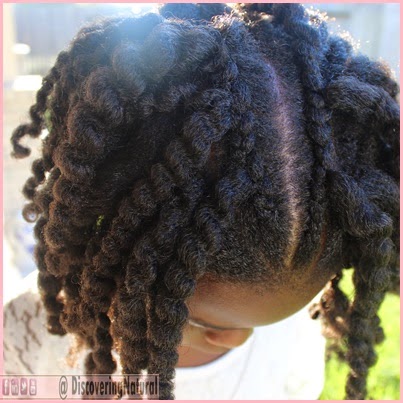
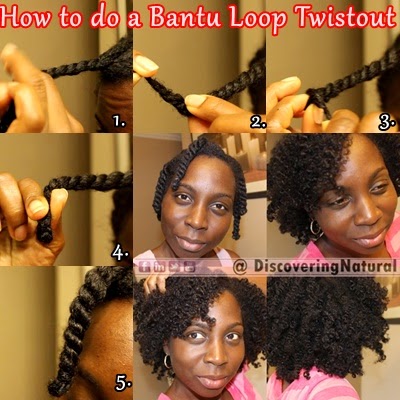
I shared a video by @prettywitty77 on my Facebook page, DiscoveringNatural, and got several requests for me to attempt it. I love a challenge. Prior to doing this style, I pre-poo my hair for 1 hour with a mixture of Extra Virgin Olive Oil (1/4 cup), Castor Oil (2 tbsp), Tea Tree Oil (4 drops).  Shampooed with Elasta QP Crème Conditioning Shampoo (old formula) Conditioned with Trader Joe's Tea Tree Tingle Conditioner Applied Black Tea Rinse Deep Condtioned with @SheaMoisture Jamaican Black Castor Oil Hair Masque Normally, I will not do a tea rinse with a protein deep conditioner, because they kind of do similar things, but lately my hair has been shedding more than normal. Left this on of 30 mins. I did a light trim after this. Rinse Applied oil on my scalp Used SheaMoisture Curl and Style Milk to moisturize my hair. Twisted bantu knot my hair in 4 sections to stretch a little and dry for about 30 mins.     The Process: Results: ...

Quick Natural Hairstyle for Work : Tucked in Pompadour

Image
I get asked so many times for low manipulative work appropriate hairstyles. Here is one that is both classy and takes less than 2 mins to do.

Flaxseed and Flexirods : Wash Day Dairy

Image
It's really cold outside and the last thing I wanted to do was to wash my hair. However, I needed to get a fresh look since my Wash and Go using my DIY flaxseed gel had run its course. I started by washing my hair with Naturalicious Moroccan Rhassoul 5-in-1 Clay Treatment  , which helped me skip Deep conditioning my hair since this product does it while cleansing my hair. While in the shower, after rinsing the clay off, I sectioned my hair into 4 chunky twists. I then covered my hair with a t-shirt for about 10 mins. On each section, I followed these steps: Massage scalp with my oil mix Apply SheaMoisture Yucca and Baobab Thickening and Growth Milk for moisture Use oil mix to seal in moisture Working in smaller sections within that big section, applied SheaMoisture JBCO Styling Lotion and flaxseed gel Twisted hair Once done twisting my entire hair, I used smaller flexirods (red) in front and larger flexirods (grey) in back to give more bouncy lo...

How to do a Side Puff on Natural Hair

Image
This is one of the easiest styles to do and it is very error-proof. STEP 1:  On an old twistout, braidout, bantu knot out, or any out style, fluff out the hair to stretch it as much as possible STEP 2: Sweep your hair to the side you want, moving your hands to your crown area. STEP 3: Secure your hair with a bobby pin, flat side up. STEP 4: Repeat pinning action on the back of your head area. STEP 5: Repeat pinning action on the opposite side of your head STEP 6: Finally, fluff your puff to let it fall and gain as much height as desired. STEP BY STEP Instructables:  http://www.instructables.com/id/Side-Swept-Puff-on-Natural-Hair/ Click video below to watch tutorial: You can also use a headband to achieve this look, here, I used The Natural Me Headband

How to Create a WaterFall Braided Twistout (Pictorial)

Image
Waterfall Braided Twistout is similar to doing a treebraid. Here are step by step instructions on how to achieve this look. You can also scroll down and watch the video tutorial. STEP 1: Cornrow the section of hair about 3 notches, then release one of the 3 strands of hair. STEP 2:     Clip the left out strand away and continue cornrowing as usual. Repeat step 1.   STEP 3:     When done with the row, you have the waterfall effect on the cornrow braid.   STEP 4:   Removing each clip at a time, do a twist on each strand of "left-out" hair. You can curl the ends with perm rods, if necessary.   STEP 5:    The finished results after unraveling the twist is a cascading twistout.   WATCH VIDEO to see tutorial and more information.           

New Year, New Hair

Image
Happy New Year!! First... Thank you all for your support in 2014. As the year draws to an end, I reflect on all we have learnt as a family and as members of the Natural hair community. We are hopeful that 2015 will bring more opportunities to share how to care for ... our hair and learn ways to make the journey easier. Stay connected with us on YouTube DiscoveringNatural, Facebook, Instagram, Twitter, and on our Vlog channel, DNVlogsLife. http://youtube.com/DiscoveringNatural http://youtube.com/DNVlogsLife   This New Year, I was fortunate to do a collaboration with 5 other Natural Hair' Listas!! We decided to do a style that we have never done before. In my case, it was the style in the video below, a Twisted Flexirod with Ombre Temporary Hair Color. Can I just say, I am TEMPTED to color my hair?   Anyways, watch how I created this look and watch till the end to see how it looks like outside in natural light!!     How I maintain:...

Twisted Bun Natural Hair Pictorial

Image
STEPS to create the style above: 1. Gather hair into a low ponytail on the right side 2. Use a hair tie to hold 3. Twist around 5 chunky twists 4. Loop twists around ponytail area and secure with bobby pin 5. Repeat until done 6. Using an edge control, apply to edges for a slick look. You can use the techniques below if you do not have an edge control product: 7-8: Admire your creation

How to Do a Bantu Loop Twistout on Natural Hair : Pictorial

Image
Bantu Loop Twistout on Natural Hair This is also known as "Hanging Bantu Knot" STEP 1 Two strand twist the hair STEP 2 Hold the end of the hair and create a loop STEP 3 Wrap the ends around the loop, as if doing a bantu knot STEP 4 The ends should be securely tucked away so that it is not hanging out STEP 5 Admire what you have done ;) STEP by STEP Instructables: http://www.instructables.com/id/How-to-do-a-Bantu-Loop-Hanging-Bantu-Knots/ Need to see this in action? Watch the video below:

My Best BraidOut on Natural Hair #HairSpaDay

Image
    After numerous fails, I have finally been able to do my best braidout. The first time I attempted a braidout, I thought it was ehhh Ok. Click here to watch . That was a year ago.  A few month after that, I tried it again and it was better but not the best. Click here to watch th at. I did not give up. Well, I did for 11 months. LOL!   The thing that baffled me about braidouts was that when I was transitioning, my braidout was always a no fail. I always had issues with twistouts. Now fully natural, the opposite seem to be the issue.   UNTIL NOW ....       WATCH BELOW