Posts

Showing posts matching the search for headband

Dr Seuss Cat In The Hat Headband DIY | World Book Day #DrSeussDay

Image
March 2nd is National Read a Book Day because it is Dr Seuss's birthday "March 2nd 1904. I decided to make a cute DIY Cat in the Cat Headband for my 3rd grade daughter. It is so simple to make. Instructions are below. This will also be great with a cat in the hat costume for a girl. The first books my kids read were books by Dr Seuss, "Hop on Pop", "Cat In The Hat" and so many more. By age 3, they were reading quite well, thanks to Dr. Seuss book. Our favorite Dr Seuss Quote: "Unless Someone like YOU cares a whole awful lot. Nothing is going to get better. It's Not" WATCH THE TUTORIAL: WHAT YOU WILL NEED Black Headband 2 White cardboard papers 1 Red Card Red Ribbons Scissors Glue INSTRUCTIONS: Cut 2 white circles, 4 and a half inches in diameter. Cut 1 red circle, 3 inches in diameter. In one of the circles, make 2 half inch slits. Pass the headband through the cut. Glue the second white circle on top. On a white ...

How to do a Side Puff on Natural Hair

Image
This is one of the easiest styles to do and it is very error-proof. STEP 1:  On an old twistout, braidout, bantu knot out, or any out style, fluff out the hair to stretch it as much as possible STEP 2: Sweep your hair to the side you want, moving your hands to your crown area. STEP 3: Secure your hair with a bobby pin, flat side up. STEP 4: Repeat pinning action on the back of your head area. STEP 5: Repeat pinning action on the opposite side of your head STEP 6: Finally, fluff your puff to let it fall and gain as much height as desired. STEP BY STEP Instructables:  http://www.instructables.com/id/Side-Swept-Puff-on-Natural-Hair/ Click video below to watch tutorial: You can also use a headband to achieve this look, here, I used The Natural Me Headband

Make your own hair accessories

Image
My girls and I love... LOVE hair accessories. Most of the accessories we have are store bought, however, I love making my own. When you make your own hair accessory, you can decorate it however you want and even make it custom fit an outfit. Below, I will show you how to make a simple headband from buttons. I bought large decorative plastic buttons and felt flower buttons. For this project, I will be using the felt buttons.  You can find these in your local craft stores. You will need: Decorative Felt buttons ( You can also use iron-on applique) Glue gun Felt fabric ( matching the color of the headband ) Fabric Headband Step 1-4: Arrange the felt flower buttons in the design you want Place the larger buttons at the bottoms and overlay smaller sized buttons on top Add acrylic jewels to add some bling  to it Step 5-8: Cut 2 strips from the felt fabric Glue one piece to the reverse side of the decorative arrangement of felt buttons ...

Friday Fun: Homemade headbands

Image
Yeah! TGIF!  It's Friday!  Bring on the weekend!! I love making hair accessories , such as headbands, hair clips, flower clips.  I think the glue gun is the best invention EVER!.. okay, not really. LOL. My kids have a lot of beads that they use to make bracelets and necklaces.  They are such girly girls and love to accessorize as much as their mom does. So, we decided to make some headbands with some of the beads they had.  It so easy that even a 3 year old can do it.  I PROMISE!  Just 3 easy step! What you need: - Glue gun - Beads or Rhinestones. - Plain looking headbands. Direction: 1. Plug in the glue gun 2. Apply some glue to the headband. I prefer fabric-covered headbands, but plastic ones can be used. 3. Place your beads or rhinestones in any pattern you want on top of the glue That's it....and VIOLA! You have a pretty headband that you can wear.  You can go as playful or as classy as you want. This was such an e...

DIY Flower Headband Tutorial - REQUESTED

Image
If you follow me on Instagram, Facebook or Youtube, you've been seeing me where this flower headband a lot. As promised, here is the tutorial for this headband. Make sure you  SUBSCRIBE if you have not already.  Thanks!!!

Friday Fun: 1 Broken Bracelet + 1 Glue Gun = 2 New Accessories

Image
Over the years, I have bought a lot of bracelets. In the past, if one of these bracelets break, I just throw it away and buy another one. Well, I have decided to start repurposing my broken bracelets. Here is how I took one  broken bracelet and turned it into a ring and a hair accessory You will need: Broken bracelet or necklace with different decorative beads Ring band Glue gun Headband Scissors Step One: Seperate the decorative beads and charms by cutting off the thread that connects them. Step Two: Assemble each of the beads and charms for easy access.  Determine which part you will use for the ring and the headband Making the ring: I choose to use this beautiful bracelet charm. Making a horizontal ring Step One:  Using the glue gun, put some glue on the ring band. Step Two: Attach the decorative charm, horizontally on the ring band. Hold against the ring band for a couple of seconds. Her...

How To Create A DIY HeadBand Holder Organizer

Image
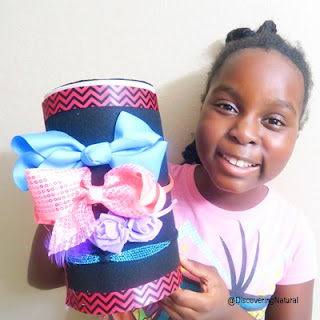
In this video, Lil Sis makes a DIY Headband Case or Holder. To watch the vlog that shows her buying what she needs, visit our family vlog channel, DNVlogsLife. You will need: A canister, like Quaker Oatmeal Ribbons Felt sheet Glue Scissors

How to Accessorize Natural Hair

Image
You can make any ordinary hairstyle look classy and elegant. IrresistibleMe.com has lots of hair accessories to pick from. Visit their page at http://bit.ly/IM_Hair887 and use my 10% off non-expiring discount code "IrresistibleSola" on your order. Accessories featured on this video (in the order shown) ♥ Zoey Hair Barrette ♥ Alexandra Hair Barrette ♥ Venus Headband     ♥ Celine Headband ♥ Pearl Headband   ♥ Juno Hair Comb